Unknown's avatar

About Plant Some Joy

Spread joy with fun and easy ways to add plants to your life.

Here’s one for the pollinators

Butterfly weed, a North American prairie plant, was named Perennial Plant of the Year for 2017 by the Perennial Plant Association. Great news for pollinators!

Butterfly weed (Asclepias tuberosa) is a veritable nectar bar for many different kinds of bees, beneficial wasps, butterflies, and even hummingbirds. And if you want to help monarch butterflies, this plant is tops because it’s a favorite food source for their caterpillars.

monarch_caterpillar_danaus_plexippus_on_asclepias_tuberosa_butterfly_milkweed_2284495213
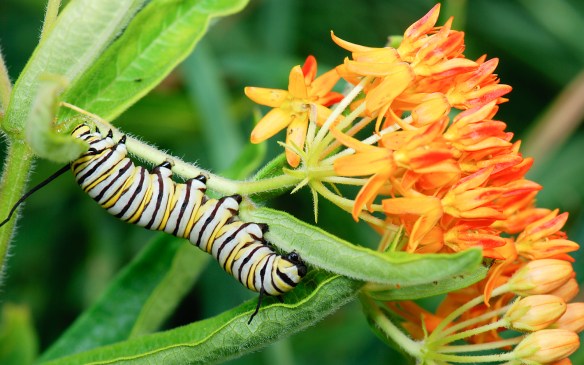
The overall habit is upright, with lance-like leaves spiraling up the stem. It tops out at 2-3 feet, and is crowned with orange flower umbels from early summer to mid-fall. The flowers are pretty cool if you look at them closely. After flowering, long skinny seedpods form—a dead giveaway that butterfly weed is in the milkweed family. As fall progresses, the pods dry out, split open, and release seeds that have silky hairs to help them float on the wind.

Butterfly weed grows best in full sun and average, well-draining soil. It can handle brutal summer heat and winters as low as -25 degrees F (USDA Zones 4-9).  True to its prairie origins, butterfly weed is pretty drought tolerant once established in the garden. It seeds around a little in my garden, but I welcome it wherever it pops up. It’s never invasive and is such a great wildlife plant. As an added bonus, deer don’t seem to like it.

If you love hot colors, butterfly weed’s blazing orange flowers will be just your thing. Grow it with other eye-popping perennials like daylilies and red bee balm (Monarda) for a fiesta of color. If orange flowers scare you, tone down butterfly weed’s volume with blue, purple, or white companion flowers for a softer look.

You can grow butterfly weed from seed fairly easily. Plants aren’t often available in garden centers, but hopefully that will change now that it has some street cred. Patronize your local garden center and ask for it if they don’t offer it. Plant some and you’ll be doing something great for pollinators and hummingbirds.

Photo credit: Marshal Hedin from San Diego [CC BY 2.0] via Wikimedia Commons.

Here’s What’s New

I attended the Mid-Atlantic Nursery Trade Show (MANTS) in Baltimore this week. This giant trade show draws thousands from the horticulture industry each year—plant growers and breeders, and suppliers of a dizzying array of machinery, tools and products. It’s a great place to see what’s new, what we’ll see in garden centers soon, and connect with people.

One of the most exciting line of plants are the Bushel and Berry blueberry and bramble fruits. These plants are bred to stay small, so they can be grown in containers, yet produce large volumes of delicious fruits. The raspberries and blackberimg_5972ries are thornless for painless picking. Many of the plants in this line were introduced several years ago under the brand, Brazelberry. Since then, the plants have been tested and improved and more added to the lineup. What this means is that when you buy plants in the blue Bushel and Berry pots, you can be sure you are getting a terrific plant that will provide a bounty of delicious berries. To top it off, the plants are beautiful too!

Here are a few other photos from the show:


Don’t kill that orchid!

You can enjoy beautiful, long-blooming orchids in your home thanks to modern propagation methods that allow orchids to be

img_3947

This orchid bloomed for months in my bedroom. What a joy!

inexpensively mass produced. Most of the ones you’ll find in big box and other retail outlets are the moth or Phalenopsis orchids, and they are super easy to grow at home. Moth orchids are terrific because they bloom a long time—usually months and months. And the flowers are so exotic and beautiful! If you have one or are considering buying one, here are some tips to keep it blooming:

  • Before leaving the store, make sure your orchid is loosely but completely covered with a plastic or paper sleeve if temperatures are below 50 degrees. Go directly home—it’s not a good idea to leave your orchid in the car while you run more errands since they don’t love the cold.
  • Once home, remove all the wrapping and tags. Place the orchid in a bright window. Eastern exposure is ideal. Southern and western windows work too, so long as the plant is protected from strong afternoon sun by a sheer curtain or blind.
  • Moth orchids make good housemates because they like the same indoor temperatures we do—mid 60s to low 70s. If you keep your house on the cool side, find a warm spot for your new friend.
  • When it comes to watering, don’t drown your orchid with kindness—this is probably the biggest mistake when it comes to keeping orchids. In the wild, orchids live on tree branches and rocky outcrops, with their roots exposed to air. Water your orchid when the pot feels light when you pick it up. This can be hard to gauge but you’ll get the feel for it. Generally every 7-14 days is sufficient. Water by dunking the pot containing the plant and bark into a larger pot of water, just up to the rim, and leave it til it stops bubbling, generally 5 minutes or so. If your orchid is planted pot-in-pot (the plant and bark in an inner pot, with a decorative outer pot that has no drainage hole), you can use the outer pot as the “dunking pot.” Once bubbling stops, lift the pot out of the water and let it drain. Empty the dunking pot before putting your orchid back in it. Alternatively, place the pot in the shower, and run it for several minutes using tepid water. If your orchid is planted pot-in-pot, remove the outer decorative pot so the plant can drain.
  • An orchid’s beautiful blooms require energy, so they benefit from some food. Feed your orchid in the late spring and summer, when it’s not flowering. The easiest way to feed is with orchid sticks that you shove into the bark mix. You can also use liquid orchid food mixed to half strength every time you water.

Enjoy your orchid!

Winter pruning

On a sunny mild day early in the year, I bundle up and tromp outside to begin winter pruning of my shrubs and small trees. Despite the cold, this is a garden chore I relish. I love being out in the brisk fresh air. I revel in the lengthening daylight and spending time felcosin my garden after December’s hectic, short days.

Pruning is part science, part art. It is done primarily to improve the health of shrubs and trees. If you find yourself repeatedly pruning or shearing (or wanting to prune or shear) trees or shrubs to reduce their size or keep them from encroaching on your house, walkway, or driveway, consider removing the plant and replacing it with something more suitable since repeated whacking isn’t good for the plant and, certainly, you have better things to do with your time!

My pruning tools include sharp hand pruners, sharp loppers, leather gloves to protect my hands, and a tarp for gathering trimmings and dragging them to the brush pile.

pruning

When pruning trees and branching shrubs, cut all the way back to where the branch joins another branch.


If you want to do some winter pruning, keep the following points in mind:

  • Spring-blooming shrubs like forsythia, lilacs, quince, viburnum, azalea, crabapples, and rhododendron have already formed their spring flower buds (they formed them after blooming last spring). Those buds are just waiting for longer days and warmer temperatures to pop open. Prune those spring bloomers now and you’ll be cutting off those flower buds, reducing the spring show. If you don’t want to reduce the spring flowers, wait to prune these plants until just after they are done blooming and before they have formed next year’s flower buds.
  • Some plants “bleed” sap heavily when they are cut. Maples are notorious for this. After all, maple sap is what is tapped in winter to make maple syrup. These trees are better off being cut in the fall, right after they go dormant.
  • Don’t attempt to prune large trees yourself or any tree or shrub that requires you to climb a ladder. Hire a certified arborist. To find one, visit the International Society of Arboriculture website.
  • It’s ok to remove up to about a quarter to a third of the plant’s living branches. If your plant has not been pruned in a long time, you may need to spread the pruning out over 2-3 years.
  • Aside from the tools listed above, the best tools you can use for pruning are your eyes. Put down your pruners periodically to look at what you are doing. This helps keep you from cutting too much or ruining the plant’s shape.

Ready to tackle your pruning project? Here are the basic steps:

  1. Begin by walking all the way around the plant at least once. Note how it grows and its natural form. Does it have an upright, horizontal, or weeping habit? Does it grow with a lot of branches at the base (called a suckering habit) or does it branch from one or two main trunks (like a tree)? Overall does it look balanced, or is it lopsided with more or less growth on one side?
  2. Trim out dead, broken branches first. Cut back to where the branch intersects with another live branch, or all the way to the ground in the case of suckering shrubs. If the plant has not been pruned in some time, it can take quite some time to remove all the dead branches. In fact, cutting dead wood should make up 80% of any pruning job.
  3. Once all the dead wood is out of the way, you can start to see the natural form of the healthy plant. The next step is to clear out its interior to improve light and air circulation. Trim branches that are crossing back and growing inward, toward the center of the plant. If the plant’s habit is suckering growth from the base, thin a few of the biggest interior branches at ground level.
  4. Step back and observe the plant’s natural overall shape. The last little bit of pruning involves a few snips to enhance that natural form: thinning any overly dense areas or trimming the odd wayward stem or two.

Congratulations on a good pruning job!

Below are photos showing renovation of overgrown spireas I helped a friend with. Left–the old beautiful spirea were engulfing the garden before pruning. Center–after pruning, the shrubs are a much more manageable size while retaining their graceful natural shape. Right–spirea grow from the base, so here you can see the cuts we made and remaining branches.

Cool succulents

Fun and funky, strange and weird… succulents are all that, plus easy to grow. They are everywhere these days too, just hit your local garden center, nursery, or big box store. Succulents are offered in a whole range of shapes and sizes and in plain nursery pots or decorative containers to fit any décor.

Here are some I love growing:

  • I bought a Trail of Tears (top left) as an itty bitty thing. I transplanted it from a plastic nursery pot to a terra cotta pot. I mixed some sand into the potting mix (about 2/3rds potting soil and 1/3 sand) and hung it in a western-facing window. Once in a while I tuck the longest strands into the soil, where they root, because my cat plays with them when they get too long.
  • My jade plant (bottom image) is a clone of one my mother acquired in the 1950s, ro-oted from a leaf. It spends summers outdoors on the porch, where it is shaded yet gets bright light, and overwinters indoors in a sunny south-facing window.
  • The charming aloe (top right) is from a cutting I received many years ago from my Aunt Eliza. It blooms almost nonstop with small yellow nodding flowers on a long stalk. I have divided it many, many times and love sharing it with friends.
  • I love paddle kalanchoes. The one pictured at the top of this page has red edges on the leaves and was a gift from one of my garden design clients. The great thing about gifts of plants is that they remind you of the person who gave it to you!

Succulents are so easy to grow. Just plant yours in sandy soil if it didn’t come that way (see rough proportions above) and put it in a bright window—south- or west-facing is best. Go easy on watering—once a week at most but probably more like once or twice a month.

Feel free to ask a question if you have a succulent or want to grow one. I’ll cover how to re-pot and divide succulents in a future blog post. Have fun with your succulent!