
Last week I attended the 50th Mid-Atlantic Nursery Trade Show at the Baltimore Convention Center, the absolute best place to get a full-on view of what’s new in the green industry. The 30,000-foot exhibit space is jammed with plant breeders and growers; tool, equipment and apparel purveyors; resellers of outdoor furniture, pots, and statuary in every shape, size, and color; companies who formulate and sell soil amendments, mulches, and fertilizers; and much more. Here are a few of the cool things I saw:
‘HGC Jacob’ hellebore— If you’re looking to add some winter blooms to the garden, hellebores fit the bill, and this one blooms early: November and all through winter. I like the way its bright white flowers are held upright above the foliage so you can really see them in the garden. Dark leathery leaves remain attractive all through summer too. But this hellebore wasn’t the only new kid on the block. There were more new perennnials (and some terrific older ones) than you could shake a stick at.
Succulents and air plants—The succulent and air plant craze continues, and that’s ok by me. New shapes, sizes, and colors continue to hit the market. After all, there’s always room for one more on the windowsill, right?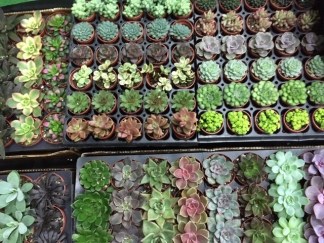
Downy mildew-resistant impa tiens—Shade gardeners have been subbing coleus, begonias, and caladiums ever since downy mildew flattened impatiens about eight years ago. While those substitutes are perfectly fine plants, we’ve missed our impatiens. Plant breeders came to the rescue and are now offering us a slew of mildew-resistant varieties, including this deep-red number called ‘Beacon.’
Blight-resistant bo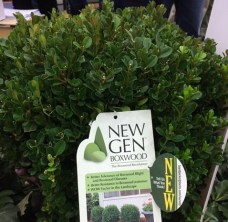 xwood—Speaking of devastating diseases, boxwood blight has been a doozy. It’s especially tough because boxwood has been a reliable and long-lived structural element in gardens for centuries. Once again, plant breeders have stepped up and introduced blight-resistant varieties like NewGen Independence® and NewGen Freedom,® which are set to hit the market this year.
Insect-resistant hemlock—Our majestic stands of hemlock trees have been brought to the brink by a nasty introduced pest, the wooly adelgid. Up to this point, chemical intervention has been the only effective way to save hemlocks in the landscape and in the wild. Thankfully, the scientists at the U.S. National Arboretum are getting ready to introduce an adelgid-resistant hemlock called ‘Traveler.’ A cross with Chinese hemlock, this variety has a slightly more weeping habit than our native hemlock, but to the average gardener, it looks pretty darn similar. You may not see this variety in the nurseries for a couple more years, so until then keep checking and treating your hemlocks.
 Witchhazels and a tree-form winterberry holly—The best thing about MANTS is talking to the people you meet or reconnect with. Tim Brotzman is a wizard when it comes to tree propagation and I enjoyed visiting his booth and talking to him and his wife Sonia. Some of his 125 varieties of witchhazels were on display in full bloom, as was an interesting tree form of winterberry holly (usually this is a thicket of a shrub). Tim’s nursery in Lake County, OH is wholesale only, but you will find many of his creations at your local garden center.
 The bougainvillea whisperer—After failing spectacularly with bougainvillea last summer, I was gobsmacked by the colorful display at the Topiary Creations booth. Claude was kind enough to give me a detailed rundown on how to care for them and, most importantly, how to get them to re-bloom. My good friend Mrs. Know-It-All captured his tutorial on video, and you can find it (and other videos from the show) at this link (be sure to scroll down): https://www.facebook.com/Mrs-Know-It-All-135749349792882/.
Vole King—No, this isn’t the ruler of those rotten little rodents that eat your bulbs, turf, and hosta roots. This is an innovative company that makes products to foil those pesky critters. Featured at their booth were stainless steel mesh ‘bags’ of various sizes in which you can plant perennials, shrubs, and even trees to put the ‘closed’ sign on your subterranean all-you-can-eat buffet. If you are plagued by these voracious vegetarians, head on over to voleking.com and pick up a few bags or even a roll of the mesh for your garden.
![]() 50th Anniversary panel discussion—I can’t close without highlighting the fact that this was the 50th anniversary of MANTS! We garden writers were treated to a special panel discussion by veterans of the show who shared how it has changed in those 50 years, what hasn’t, and their outlook for the future of the green industry.
50th Anniversary panel discussion—I can’t close without highlighting the fact that this was the 50th anniversary of MANTS! We garden writers were treated to a special panel discussion by veterans of the show who shared how it has changed in those 50 years, what hasn’t, and their outlook for the future of the green industry.
- How the show has changed (aside from getting bigger): More women in the industry; more colorful perennials and flowering trees and shrubs; the introduction of branding and marketing of plants; evidence of climate change (one panelist likened Baltimore to “frozen tundra” during MANTS, but now the days are usually above freezing).
- What hasn’t changed: The common denominators remain the advancement of plants, gardening, horticulture, and people.
- Panelists’ outlook for the future: The green industry has a critical role to play in climate change by offering trees, shrubs, and other plants that can be used for carbon sequestration. Labor will continue to be a challenge as long as restrictions on H-1B workers remain and young people do not see the benefits of a career in the industry. There are many new opportunities such as cannabis and hemp production, bioremediation, and new plant development to combat introduced pests and diseases.
 ellow throats and delicate pistils. Each flower stretched its petals wider until they formed one glorious globe of sherbet orange and yellow against thick strappy foliage. The show has gone on now for several weeks, delighting me no end.


