Eating babies

IMG_9284While thinning beets in my garden the other day, I stopped to consider the little plants I was killing. The slim red root that would never grow into a round beet. The first tiny seed leaves and larger dark green adult leaves. They looked so fragile, uprooted from the soil. I knew that thinning the crowded seedlings was necessary if the chosen few I left in the ground were to mature into beets for my table. I felt some remorse for the ones I pulled out.

Then I wondered how these babies would taste. Afterall, you can eat beet greens and we grow beets for their roots. The pulled seedlings were nothing more than tender young leaves and immature roots. I brushed the soil off one of the tiny roots and tasted a leaf. It was crunchy and mild. I ate the rest of the leaves with the root and decided it was pretty delightful.

Mature beet greens are slightly bitter and tough, and are best sautéed with garlic and olive oil. But as I munched another seedling, I decided its delicious crunch and fresh green taste would be best raw, in a salad.

On my way from the garden I picked a few nasturtium flowers to add to the salad. Nasturtium flowers are tender and have a slightly peppery taste. Their bright yellow and orange petals add beautiful color to dishes.

The salad I made for dinner guests that evening consisted of rough chopped romaine lettuce, sliced cucumber and orange bell pepper, the little beet seedlings—washed and chopped in half—and a handful of nasturtium petals. I tossed it with a simple lemon dressing (recipe below).

You’d probably pay a fortune for this early summer treat in a fancy restaurant, but I will look forward to making it at home every time I sow beet seeds. In fact, I might be making room in my garden for an extra row of beet seedlings from this point on, just so I can eat the baby plants.

Simple lemon salad dressing

  • ¼ cup freshly squeezed lemon juice
  • ½ cup olive oil
  • 2 teaspoons brown mustard
  • 1 teaspoon kosher salt
  • ½ teaspoon ground pepper

Shake all together in a jar with a tight fitting lid. Taste and correct flavors as needed. Dress salad and toss just before serving. Any leftover dressing can be refrigerated to use later.

Pictured here are golden beet seedlings and nasturtium flowers. I grew two other kinds of beets, Detroit Red and Chioggia, and they were tasty too.


Miraculous seeds

Looking for a miracle? Just start some seeds. This determined little bean seedling emerged today from a seed that, a few days ago, looked like a wrinkled pebble. It’s hard to believe this vigorous little life was inside that dried-up orb.

seedling
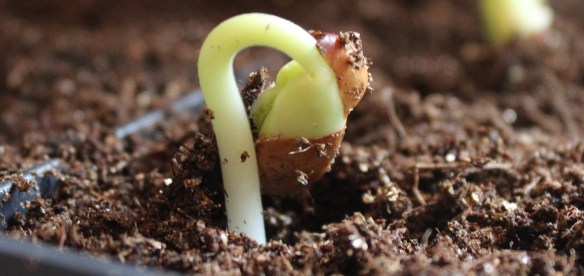
Seeds contain everything to start a new plant–root, shoot, and two little seed leaves called cotyledons. Plus all the DNA that will determine the plant’s form, habit, flower color, fruits, and other attributes.

Give a seed a little moisture, light, and warmth and presto–new life erupts. How can you not believe in miracles when you watch a seed germinate?


Feeling seedy

Despite the warm winter here in Pittsburgh, I—like many gardeners—have cabin fever. I’ve hit the problem head on with some retail therapy: my annual seed order.

I’m determined to grow fantastic onions this summer so I bought Walla Walla onion seeds from a loimg_61701cal garden center. Sure, I’ve grown nice onions before by purchasing ‘onion sets’ and plugging them into the garden. The resulting onions were fine, but not fantastic. I’m going for fantastic.

I learned from fellow master gardener Paul Pietrowski to choose long day onion varieties for our climate. He’s had the most success starting them from seed, rather than sets. So today I sowed the Walla Walla seeds in moistened, sterile seed starting mix. I’ll plant the seedlings outside in the garden after 8-10 weeks.

I ordered Italian ‘San Marzano’ tomato seeds from Renee’s Garden. I’m excited to try those for making sauce, as well as a new red beet, ‘Sweet Merlin.’ I’ll turn a packet of ‘Roma Improved’ beans into jars of pickled dilly beans.

Three interesting flowers caught my eye in the Select Seeds catalog. I’m excited to try ‘Chinese Giant Orange’ amaranth, which gets 8 feet tall and provides lots of seeds for birds. There is also a cool Queen Anne’s lace I’ll grow called ‘Dara.’ The blooms start out white, like regular Queen Anne’s lace, but turn pink and purple as they age. It’s a great plant for pollinators too. I saw the curious corkscrew vine on a visit to Bartram’s Garden in Philadelphia last summer. This fragrant climber is in the bean family and hails from South America.

How about you? Have you ordered seeds yet? What are you excited to try this year? !

‘Lettuce’ start with something simple…

Imagine—crisp, fresh lettuce you harvest anytime you want. Nothing could be easier than growing your own lettuce in a pot. Here’s what you need:

  1. A pot
  2. Potting soil
  3. Lettuce seeds
  4. Lettuce is best grown outdoors, but you can grow it indoors under grow lights (fluorescent or LED). More on that in a bit.

The details:

Pot—The key here is to have a drainage hole in the bottom. Something at least 14 inches across is best.  As far as material for your container, just about anything will work—terra cotta, metal, ceramic, plastic, wood, you name it. Anything goes for shape too; round, square, oblong… all good. And have fun choosing a style of pot, whether it’s rustic, modern, funky, or chic.

Potting soil—Good potting soil is critical to your success. I really don’t like some of the more readily available commercial potting soils in big box stores, so I encourage you to visit your local independent nursery and ask for the potting soil mix they recommend. (Note: you want potting soil, not seed starting mix.)

Seeds—choose whatever you like to eat. There are so many kinds of lettuces to try: Simpson black seeded, Buttercrunch, Red Sails, May Queen, Mesculun, and Rocket, to name a very few. You can buy lettuce seeds at any good nursery, and garden centers carry them during the growing season. For a wider selection of lettuce varieties, buy seeds online. There are many good seed sources, but my favorites include Renee’s Garden (www.reneesgarden.com), Pinetree Garden Seeds, and Seed Saver’s Exchange.

Light—Outdoors, look for a spot that gets morning sun and afternoon shade. Indoors, you’ll need fluorescent or LED grow lights. Bottom line: lettuce seedlings need light for 12-14 hours per day to grow well.

Put it all together:

  • Scoop the potting soil into your container, filling it to within two inches of the top. Gently firm the soil with your hand.
  • Open a packet of lettuce seeds and gently tap them out onto the soil surface so they are spaced about a quarter inch apart. The seeds are pretty small and dark, so might be hard to see on the soil. If you get clumps, just separate them with a pencil or toothpick. It doesn’t have to be perfect.
  • Take a little more potting soil between your fingertips and sprinkle it over the seeds. Gently press the soil using your fingertips, so the seed makes contact with the soil.
  • Place a plastic tray under the pot to catch water that may come out of the drainage hole. Water in the seeds with a gentle sprinkling of water. Be generous with the water but don’t use so much that the soil is sopping wet.
  • Place the pot outdoors or under lights. If you are using lights, they need to be set 2-4 inches above the surface and remain on for 12-14 hours a day. A plug-in timer is really helpful, so you don’t have to remember to turn the lights off and on.
  • Check your pot every couple days. Your seed packet may include information on how long your variety of lettuce takes to sprout. A few days before or after that, you should start to see little green sprouts.

Now you’re growing!

Once your lettuce sprouts, water lightly when the soil appears dry on the surface. You don’t want the plants to get to the point where they are wilting, yet you don’t want them waterlogged either.

Rotate the pot once a week or so, so the seedlings grow straight and strong. If you are using grow lights, raise them as the lettuce grows, so the lights remain 2-4 inches above the tops of the growing plants.

Don’t worry about fertilizing, the potting soil contains all the nutrients your plants need.

Check your lettuce packet for the number of days your variety takes to reach maturity. This will give you an idea of how soon you can start harvesting.

Once your plants reach maturity—or even a few days before—you can start harvesting. Grab a pair of scissors in one hand, and with the other gently grasp your lettuce plants. Cut straight across about an inch from the soil. The plants will re-sprout, giving you a continuous harvest.

After several cuttings the plants will begin to lose vigor. At that point, pull them out and start over with another round of seeding if you want. You can re-use the same soil for the second planting, but you should add a little liquid organic fertilizer at planting time.

Enjoy your lettuce!